
RTLS Deployment Guide for SMEs: From Site Survey to Go-Live
This RTLS deployment guide walks small and medium-sized businesses through a real-time location system rollout in seven steps, from the first site walk to the day staff start using the dashboard. A battery-powered BLE system needs no network cabling and no civil work, so the real effort is in planning: choosing what to track, mapping the floor and testing before you scale.
Step 1: Pick One Problem and Measure It First
Start with a single, costly problem: pallets that cannot be found, forklifts and workers sharing the same aisle, stock that leaves its zone after hours, or products that must follow first-in, first-out. Write down today’s numbers, such as minutes spent searching per pallet or incidents per month. These become the baseline that proves the pilot worked. Our guide to what an indoor positioning system is explains the basic concepts if your team is new to the topic.
Step 2: Walk the Site and Map Your Zones
A site survey is a walk through the facility with a floor plan in hand. Mark dock doors, racking, partitions, columns, cold rooms and outdoor areas. Then decide the accuracy each zone needs. Most areas only need room-level or bay-level location, which is enough to answer “which aisle is this pallet in?”. A few zones, such as dense pallet racks or dock doors, may justify higher accuracy. Metal racking, thick walls and partitions affect radio coverage, so note them now.
Step 3: Match the Technology to Each Zone
Our BLE mesh (Bluetooth 5 mesh) covers most indoor areas at room or bay level. Angle-of-arrival (AoA) antennas mounted on the ceiling suit zones where accuracy matters most. LoRaWAN tags cover yards and outdoor areas, handing off to Bluetooth indoors. Use the cheapest option that answers your question in each zone. Our RTLS technology comparison sets out the trade-offs, and the Bluetooth Special Interest Group publishes the underlying standards.
Step 4: Place Gateways and Beacons
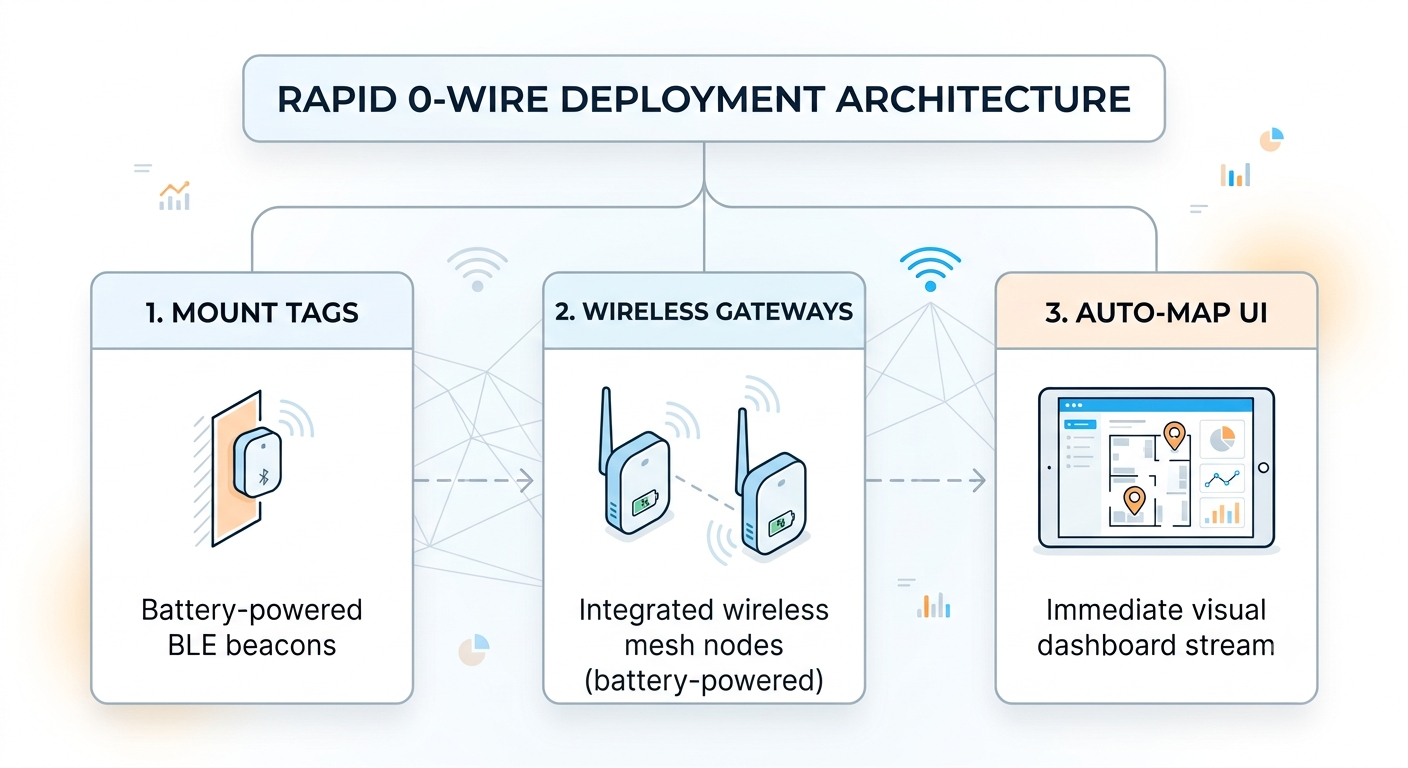
Mount gateways on walls and columns, above racking where possible, and add gateways to extend coverage, one area at a time. Beacons and tags attach with adhesive or standard fixings. Because the hardware is battery-powered, you do not need electricians or cable runs, and a layout change is a software update, not a rebuild. Read how RipplesIPS works for the components in detail, and see inventory tracking beacons for tag types such as pallet tags, asset tags and wearables.
Want a second pair of eyes on your floor plan? Send us your layout, and we will suggest where to place the first gateways. Talk to the Ripples team
Step 5: Tag Your Assets and People
Tag pallets when they are received, so that every pallet enters the system with a known location and owner. Give each tag a clear naming convention that matches your stock codes. For worker safety, wearable tags carry a hardware panic button, which sends an alert to the dashboard. See employee tracking for productivity and safety for how to introduce wearables to your team.
For high-value pallets and temperature-sensitive stock, consider dual-tag redundancy: two beacons on one asset, so location data continues if one tag is shielded by surrounding inventory or damaged. The platform reconciles both signals automatically, with no dashboard configuration. This helps most with stacked pallets, where dense cargo can interfere with a single tag, and our agri cold storage RTLS page shows the idea in a cold-chain setting. You can also group tags: for example, production pallets can be linked to a bill of materials so that a batch is tracked and shipped as one.
If staff pick from shelves or a pharmacy counter, add pick-to-light: LED tags and e-paper shelf labels guide the picker to the right item and can flag a wrong-shelf pick. Our guide to RTLS and pick-to-light for hospital pharmacies shows the idea in a real workflow.
Step 6: Configure Zones, Rules and Alerts
Draw your zones on the floor plan in the dashboard, then set the rules that matter: geofence breaches, dwell-time limits, first-in-first-out compliance and after-hours movement. Choose where alerts go, such as SMS or email, so that the right person sees them. The dashboard shows your floor plan with drag-and-drop visualisation, and for wider charting options, see our guide to IoT data visualisation tools. For theft prevention, the most useful rules are geofence alerts when stock leaves its zone, after-hours movement alerts and tag-removal alerts, backed by a timestamped audit trail. Read more on warehouse theft prevention with RTLS. Keep the first rule set short. Three rules that people act on are better than thirty that they ignore.
Step 7: Pilot, Test and Go Live
Run a pilot in one area first. Walk the zone with test tags and check that each one appears in the right room or bay. Fix any dead spots by moving or adding a gateway, then train the shift leaders. A starter kit is built for this step, and the Warehouse Pallet kit, for example, includes 50 BLE tags and 10 Bluetooth gateways for an area of up to 10,000 sq m. Go live area by area, comparing results with your Step 1 baseline. See our RTLS warehouse pallet tracking system and RTLS in manufacturing pages for typical results in those settings.
Keeping RTLS Running on a Small Budget
A good RTLS deployment guide must also cover what happens after go-live. Choose a system that tolerates a weak internet connection: an edge gateway can keep storing data locally through a power or network outage and send it on when the link returns. Battery-powered devices avoid electrical work, so start with one area and add gateways and tags as the benefits appear. Keep a few spare tags and gateways on site, because they are quick to swap. The platform can run as cloud software hosted in the EU, Canada, India or Asia-Pacific, and on-premise deployment is available where data must stay in the building. In Turkey and Poland, our partner Flexastra handles local logistics and on-the-ground support. For a yard, see RTLS for logistics yard management, and for hospitals, read our hospital RTLS planning guide.
RTLS Deployment Guide Checklist
- Choose one problem and record a baseline number.
- Walk the site and mark racking, partitions, dock doors and outdoor areas on the floor plan.
- Set the accuracy needed in each zone: room-level, bay-level or higher.
- Match the technology to the zone: Bluetooth mesh, AoA or LoRaWAN.
- Place gateways on walls and columns and test coverage with sample tags.
- Tag pallets on receipt and give every tag a clear naming convention.
- Use dual tags on high-value, cold-chain and stacked pallets, and group tags that ship together.
- Start with three alert rules that someone will act on, such as geofence, after-hours and tag-removal alerts.
- Pilot in one area, train shift leaders, then go live area by area.
- Explore our real-time asset tracking FAQ
Next Step: Plan Your Pilot
Ready to plan a pilot? Review our RTLS pricing and starter kits, or contact the Ripples team, and we will help you map your first zone deployment guide.